TaurusX Pixel Integration Guide
TaurusX Pixel is a JavaScript pixel tracking code that helps you track user behavior on your website. It works by loading a small function library and allows you to record user-triggered events (such as registration, etc.), called "conversion events."
Conversion events are displayed in the advertising management platform and can be used to measure ad performance, create custom audiences, and analyze conversion funnels.
TaurusX Pixel collects the following data:
- HTTP headers: such as browser information, page referrer, device, etc.
- Pixel-specific data: including Pixel ID, browser cookies, and more.
Integrating the Pixel Code
The full Pixel integration consists of two parts:
- Base code: imports the TaurusX SDK and initializes the Pixel ID.
- Event tracking code: reports events when user actions occur.
You can view and copy the relevant codes in the "Assets" section of the advertising platform.
Pixel Base Code
Please insert the following code into the <head> or top of the <body> in your webpage:
<script>
/* TaurusX Pixel Script */
((e,t,a)=>{var s;
e.tax||((s=e.tax=function(){for(var e=[],t=0;t<arguments.length;t++)e[t]=arguments[t];
s.process?s.process.apply(s,e):s.queue.push(e)}).queue=[],s.t=Date.now(),
(e=t.createElement(a)).async=!0,
e.src="https://files.appmeta.store/files/txevents.js?t="+Date.now(),
(t=t.getElementsByTagName(a)[0]).parentNode.insertBefore(e,t))
})(window,document,"script");
/* TaurusX Pixel Init */
tax('init', 'TAURUSX_PIXEL_ID');
</script><script>
/* TaurusX Pixel Script */
((e,t,a)=>{var s;
e.tax||((s=e.tax=function(){for(var e=[],t=0;t<arguments.length;t++)e[t]=arguments[t];
s.process?s.process.apply(s,e):s.queue.push(e)}).queue=[],s.t=Date.now(),
(e=t.createElement(a)).async=!0,
e.src="https://files.appmeta.store/files/txevents.js?t="+Date.now(),
(t=t.getElementsByTagName(a)[0]).parentNode.insertBefore(e,t))
})(window,document,"script");
/* TaurusX Pixel Init */
tax('init', 'TAURUSX_PIXEL_ID');
</script>Important
- Use the base code generated by the advertising platform.
- Make sure to replace TAURUSX_PIXEL_ID with your actual TaurusX Pixel ID.
- The Pixel ID can be found under Assets → Events → TaurusX Pixel Events → View Pixel.
Pixel Event Code
Note
Please ensure that the Pixel base code is correctly included on the page; otherwise, the event tracking code will not work.
Standard Events
Standard events are platform predefined behavior events, such as register.
You can track standard events by calling the function with the event name and an optional JSON object as parameters:
tax("track", "register");tax("track", "register");💡 Example 1: Trigger the register event on button click
<button id="register">Register</button>
<script type="text/javascript">
  $('#register').click(function() {
    tax("track", "register")
  });
</script><button id="register">Register</button>
<script type="text/javascript">
$('#register').click(function() {
tax("track", "register")
});
</script>💡 Example 2: Report the register event with user information after completion
<script>
function onRegisterSuccess() {
  tax("track", "register", {
    user: "zhangsan",              // username
    email: "zhangsan@example.com", // email
  });
}
</script><script>
function onRegisterSuccess() {
tax("track", "register", {
user: "zhangsan", // username
email: "zhangsan@example.com", // email
});
}
</script>Custom Events
If the standard events do not meet your needs, you can use the trackCustom method to send custom events, passing the custom event name and an optional JSON object as parameters.
tax("trackCustom", "vip_signup", {
  level: "gold",
  source: "homepage"
});tax("trackCustom", "vip_signup", {
level: "gold",
source: "homepage"
});Pixel Helper
The Pixel Helper is a Chrome browser extension used to detect whether TaurusX Pixel has been successfully integrated on a webpage.
Installing Pixel Helper
- Use the Chrome browser
- Install the extension from the Chrome Web Store via this link: 👉 Install TaurusX Pixel Helper
Verifying Pixel Implementation
- Open a webpage with the Pixel installed.
Note
Please make sure to open the test page by clicking the "Go Test" from the advertising platform.
The system will automatically append the required t and c parameters.
Missing these parameters may result in verification failure and affect the test outcome.
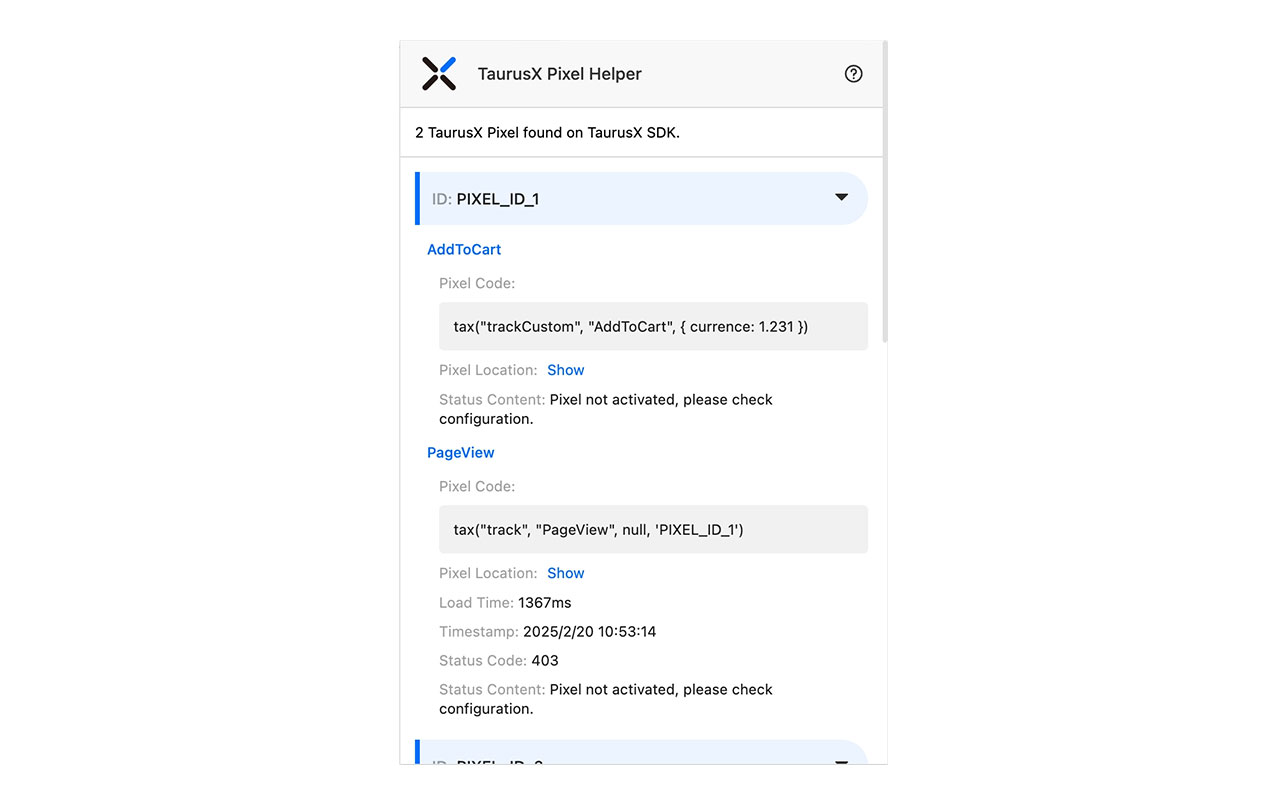
- Click the Pixel Helper icon in the top-right corner of your browser.
- A popup window will display the detected Pixel IDs and their status on the current page.
Troubleshooting
About the PageView Event
PageView is one of the standard events automatically reported by the TaurusX Pixel SDK. It is used to track user visits to web pages.
Each time a user opens a page, the SDK automatically triggers this event and sends it to the corresponding Pixel, without requiring any manual action from developers.
If you prefer not to auto-track PageView events, you can disable this behavior by adding a configuration option during Pixel initialization:
tax("init", "PIXEL_ID", { autoTrackPageView: false });tax("init", "PIXEL_ID", { autoTrackPageView: false });However, disabling this event is not recommended, as PageView serves as a fundamental data point for measuring user traffic, analyzing navigation behavior, and evaluating conversion funnels. Disabling it may negatively impact data analytics and ad performance optimization.
Special Note for Single Page Applications (SPA):
For Single Page Applications (SPAs), if you need to track page views on each route change, it is recommended to manually trigger the PageView event after each route update:
tax("track", "page_view");tax("track", "page_view");Please evaluate your specific business needs to determine whether this event should be reported during page transitions.
Integrating Multiple Pixels
If your website needs to integrate multiple Pixel IDs, simply initialize each Pixel ID after the base script has been loaded:
tax('init', 'PIXEL_ID_1');
tax('init', 'PIXEL_ID_2');tax('init', 'PIXEL_ID_1');
tax('init', 'PIXEL_ID_2');To send specific events to a designated Pixel ID, pass the target Pixel ID as the fourth parameter in the event tracking call:
// Send the "register" event to PIXEL_ID_1
tax('track', 'register', null, 'PIXEL_ID_1');

// Send a custom "vip_signup" event to PIXEL_ID_2
tax('trackCustom', 'vip_signup', {
  level: 'gold',
  source: 'homepage'
}, 'PIXEL_ID_2');
// Send the "register" event to PIXEL_ID_1
tax('track', 'register', null, 'PIXEL_ID_1');
// Send a custom "vip_signup" event to PIXEL_ID_2
tax('trackCustom', 'vip_signup', {
level: 'gold',
source: 'homepage'
}, 'PIXEL_ID_2');Important Notes
When specifying a target Pixel ID via the fourth parameter, the third parameter must not be omitted. If you don’t need to pass any data, explicitly use null.
If multiple Pixel IDs are initialized and no specific Pixel ID is provided in the event call, the event will be sent to all initialized Pixel IDs by default.
💡 This allows you to route events flexibly to different Pixel instances based on user behavior, page context, or business logic.
Pixel Not Loaded
If the Pixel Helper shows a Pixel ID but no requests were sent, possible reasons include:
- JavaScript errors in the code
- Pixel initialization placed inside delayed triggers like button clicks
- Pixel ID not correctly set
Recommendations:
- Check if the Pixel code is placed in the
<head>or top of the<body>. - Ensure Pixel initialization happens before calling the
trackevents. - Check the browser console for error messages.